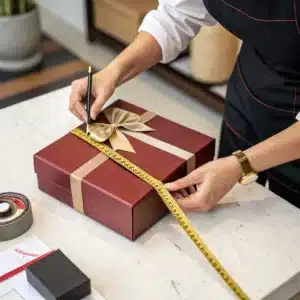
Want an accurate shipping quote but unsure how to measure your package? Properly calculating length, width, and height ensures you get the right price every time. Let’s make this simple.
To measure L x W x H you’ll need: a tape measure (flexible for odd shapes), paper, and pen. Always check the longest side first (length), then the side perpendicular to it (width), then height from base to top.
You know those times you tried to guess package measurements—and got a confusing bill later? Let’s fix that permanently once and for all.
What Tools Do You Need To Measure L, W, H Accurately?
Struggling to get precise numbers? The right tools make this easy. You can’t rely on your thumb! Here’s what to always have on hand.
Use a flexible tape measure for tricky shapes and a stiff ruler for flat edges. Note measurements immediately on paper so mistakes don’t happen later.
Choosing the right tools isn’t just about having something to measure with—it’s about handling both regular boxes and weirdly shaped packages. Let me walk you through exactly what you need and why it matters.
The Three Essentials You Must Never Forget
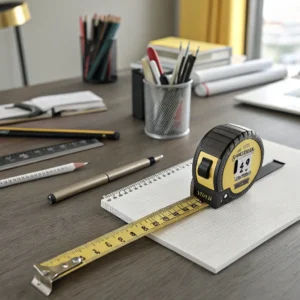
- Tape Measure: The best has a high grip surface so it stays in place on curves. Choose retractable types for quick use – the 25-foot tapes have enough length for large items.
- Pencil & Paper: Writing as you go prevents you from mixing numbers for eight different packages. I lost count of how many clients sent wrong measurements until they started this habit.
- Lighting: Good lighting ensures you’re measuring the actual package surface, not shadows or reflections. A well-lit work space makes counting inch marks far easier.
For Irregular Shapes: Think Outside The Box
- Flexible Tape wraps around uneven sides smoothly.
- Width at its Widest: Don’t guess—a rounded package is measured on the part that sticks out most.
- Height Includes Everything: Closures, handles, and flaps count. A box with a snapped-on lid is bigger once sealed.
At Lpack we’ll still take your call if you’re stuck – but this toolkit gets you 95% there. Precision here saves time and money downstream.
How Do You Find The Correct Dimensions For L, W, H?
Confusing length with height is a recipe for errors. Each measurement has its own rules—let’s clarify them once and for all.
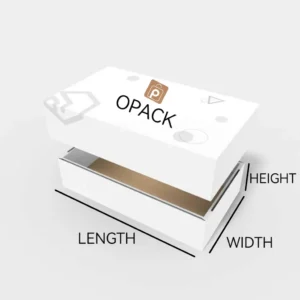
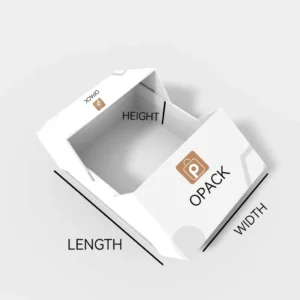
Length is the longest side. Width is the wider side on that same flat surface. Height is how tall it stands when set upright. Imagine standing rulers along each axis to get all three numbers.
Back in 2012, a client accidentally reversed L and W twice before we sent samples. It cost them extra shipping fees. A few simple steps protect you from that.
Step 1: Start With The Longest Edge
Place your package base-down on a flat surface. The horizontal side that looks the longest becomes Length. For example: A standard shoebox laid flat has its pointy toe-end down? No. Rotate it so the longest edge points forward.
Step 2: Cross-wise Width
Perpendicular to length (like the red line on graph paper) is width. It’s the shortest measurement in that base-plane. If it’s 8x8cm for a gift box, length and width are equal—that’s okay!
Step 3: Vertical Height
This is the journey from the base bottom to lid-topped. Includes:
- Box flaps glued closed
- Cylinder tubes standing upright (height = tallest side)
- Square boxes with a removable lid (measure until lid is fully secured)
Common Mistakes To Avoid
- Girth instead of proper H: Rounded packages need both height and girth. Ask carriers beforehand.
- Soft materials: Stuffed animals count height even while squished.
- Folded items: Flat-packed boxes stand taller when assembled. Measure the final form.
Start by marking a dot where you begin each measurement so you don’t accidentally measure the same spot twice.
Why Do Irregular Shapes Confuse Measurements So Much?
Trying to fit an odd-shaped item into a standard box? These steps eliminate errors. Square pegs, round holes… you know the struggle.
For irregular packaging: measure the smallest rectangular or cylindrical box that could contain your item. Note both LxWxH and girth (if required). Ask carriers specific questions about their rules.
I once had a client mailing a pyramid roof decoration. We measured three ways until it fit a standard box without rolling around loose. Here’s the proven method.
Break It Down Into Steps
- Identify The Media Box: Name it like a shipping carrier would. Your oddly-shaped item must fit inside some imaginary rectangular box. For a cylinder, check if it should stand upright or lay on its side.
- Take Max Measurements:
For a heart-shaped package: length from pointy top to bottom notch, width at the widest left-right point, height from base to highest tip. - Check Ratios: Some services restrict differences between length and height. Make sure your measurements fit their max acceptable ratios.
- Girth Equation (2W + 2H): Even when carriers ask for it, calculate separately. For example:
- A 15x10x8" irregular shipment: 2(10)+2(8) = 36" girth.
The 10% Rule Of Thumb
Always add 10% to your largest dimension for safety clearance. Real-life items shift during transit – threads loosen, fabric settles. This buffer keeps your product from getting trapped in a too-tight packing.
What’s The Procedure For Different Package Types?
Measurement techniques vary completely for cylinders vs. square boxes. Let’s get specific for common cases so you’re ready for any item.
Different package types have custom measurement rules. For example: a cylindrical tube might measure length vertically (from cap to base), while its width is the diameter. Girth is needed here. Check courier guidelines.
After managing hundreds of custom jobs, I’ve seen what fails when type-specific steps are skipped. Here’s why approach matters.
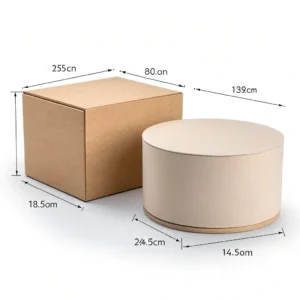
| Package Type | Length (L) | Width (W) | Height (H) | Special Notes |
|---|---|---|---|---|
| Standard Box | Longest side | Wider side perpendicular | Height when set upright | Ensure lid/flaps closed |
| Cylinder | Height when upright | Diameter (width between sides) | N/A—calculate girth (2W + 2H) | Ask carrier if ‘standing’ or ‘laying’ |
| Soft Pouch | Longest point when laid flat | Wider spread of pouch | Height when filled snugly | Use container/bag with firm filler |
| Angled Edges | Longest support axis | Wider point at base level | Upright vertical height | Account for tilt in dimensional capacity |
Carrier-Specific Tips
- FedEx/UPS: Max length-to-height ratios (e.g., longest side must be ≤ 130" of total girth+length)
- DHL: Enforces "non-rectangular" penalties for certain shapes – so choose standard boxes when possible
- In-house Packaging: Store your measurements in a tracking spreadsheet with images. Include photos to prevent recurring clergyman errors (sounds like 6.0 looks like 69 on phone screens).
How Should You Document Your Measurements?
Recording numbers in a haste often backfires. A simple system ensures clarity in client emails.
Write down all three dimensions plus any special notes immediately after measuring. Include units (inches/cm), materials, physical condition, and any damaged spots that affect size.

I learned this the hard way when “12” became a major issue—a supplier took it as 12cm vs. my stated inches. Units matter. So do storage orientations.
Proper Documentation Template
Client: [Name]      Date: [MM/DD/YYYY]
Product: [Yoga Mat Bag]
Dimensions:
- Length: 24" (horizontal base)
- Width: 8" (across base perpendicular)
- Height: 4" (base to lid)
Special Notes:
• Curved top requires 10% clearance buffer
• Soft fabric may compress up to 15% during shipping
Units: All measurements in inches
Avoiding The Top Three Documentation Errors
- Missing Units: “48” means nothing without "cm" or "inches". We once quoted Malaysian cm thinking it was US inches—disaster.
- Forgetting Closures: A bag with a Velcro strap takes ¾" more when closed tightly.
- Over-Precision: 12.752 inches? Round to 12.75" or 12 3/4". Most systems only use two decimal points.
Use photos alongside written notes. Even a phone snapshot showing your ruler next to the package helps resolve questions before they escalate.
What Happens If Measurement Goes Wrong?
An incorrect LxWxH can jack up costs, waste materials, or damage items during transit. Not fun. Let’s look at real consequences.
We once made 500 mis-sized phone case boxes because of a decimal point typo ("80cmossed" vs. "8cm"). Always verify after inputting into quoting systems.

That $2,000 error could’ve been caught in three minutes of double-checking. Here’s how prevent disaster.
The Cost Domino Effect
- Inefficient Shipping: Too-large boxes = more fuel emissions and higher rates.
- Inventory Issues: Regular sizes are bulk-stammable. Off-measurements eat warehouse space.
- Damaged Products: Squeezing an item forces pressure points; oversizing allows shifting during transport.
- Return Expenses: Customers can reject snugly packed products thinking they got the wrong item.
Three Step Safety Check
- Box Up First: Pack your item, then measure the packaged item – not the raw product.
- Compare With Standard Sizes: How much does that 15×10×8 bag cost vs. a 15×10×9?
- Mock-Up Preview: Snapped a photo and gotten a second opinion costs 10 minutes versus $200+ retracking
Conclusion
Accurate LxWxH measurements prevent pricing surprises and shipment issues. Measure every dimension precisely with proper tools and documentation to avoid headaches.